FAQ
Accessing Your Paystubs/W-2 Forms
- To access this system, you need to have your 7-digit City Employee ID# (or Reference Number) which can be found in the upper middle part of your paystub in the box called “Reference #”. This is not your EMPL ID.
- If you do not have a copy of an old pay stub, please email the Office of Human Resources at HumanResources@qcc.cuny.edu, along with your EMPL ID number, and they will provide your Reference Number.
- Send an email with your 7-digit Reference Number to University Payroll at University_Payroll_Security_Adm@cuny.edu requesting a temporary password
- Once you have the temporary password, navigate to the My Paycheck Page or enter the following URL in your browser: www.nyc.gov/site/opa/my-pay/my-paycheck.page
- Select 'Employee Self-Service' in the narrative under the box titled “My Paycheck”

- Input your UserID. This is your 7-digit City Employee ID# (or Reference Number) which can be found in the upper middle part of your paystub in the box called “Reference #”. This is not your EMPL ID.
- Input your temporary password. Please note you only have three attempts at using this temporary password before you are locked out of the system. Reach out to the contacts below if you cannot access the system after the second attempt.
- Upon login, follow the prompts to create a new password before you access your stubs. Your new password must be at least 8 characters in length and contain at least one number. You will also be prompted to choose five password authentication items. Make a note of your answers in case you need to authenticate your password in the future.
- You will be prompted to enter a verification code. If you do not see your QCC email, or get any other error message please click on this link to update your QCC email in CUNYfirst:
- The verification code may come into your spam or “Other” mailbox in Outlook, so please look there before requesting another code.
- Enter the code.
If you encounter issues with the system, including using the temporary password, please contact CUNY at University_Payroll_Security_Adm@cuny.edu .
If you have questions about this process, please contact Martha Aspromatis at MAspromatis@qcc.cuny.edu.
COELIG Financial Disclosure or Exemption Filing
The New York State Commission on Ethics and Lobbying in Government (COELIG) mandates required faculty and staff to file an annual Financial Disclosure Statement (“FDS”). The following questions and answers are intended to summarize for you the most important principles and dates.
Who must file?
Policy Makers: You must file an FDS if you are considered a Policy Maker. As a Policy Maker you are not eligible for an exemption. Although the FDS asks for financial data for 2023, the determination as to whether you must file must be made on the basis of your duties and salary as of April 1, 2024. The filing date for 2023 is May 15, 2024.
Faculty Members: You must file an FDS if your annual salary as a faculty member is more than $111,897 and you have not previously received an exemption. Although the FDS asks for financial data for 2023, the determination as to whether you must file must be made on the basis of your duties and salary as of April 1, 2024. The filing date for 2023 is November 15, 2024.
When must I file?
Policy Makers: May 15, 2024
Faculty Members: November 15, 2024
Where do I file?
The form for the 2023 Financial Disclosure Statement is available on your Dashboard under File FDS.
To get to your Dashboard you must do the following:
New Filers
New filers will need to create a NY Directory Services account before filing. In order to create an account, please do the following:
Go to http://my.ny.gov and click on “Don’t have an Account”
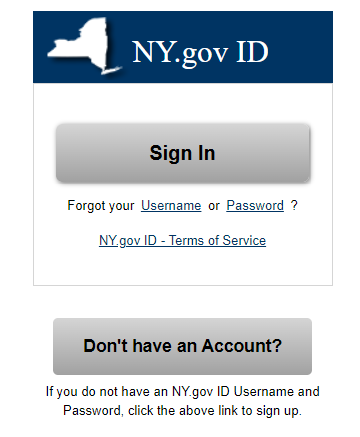
Select the box “Personal”
Create a username and password by following the prompts
After you’ve created a username, please email the username to fdshelpdesk@ethics.ny.gov
You will receive a return email that states you can go into the system to file your financial disclosure statement.
Return Filers and New Filers With Passwords
Go to http://my.ny.gov and type in your User Name and Password
After you log in you will see this screen. Click on this screen, which will take you to your Dashboard:

You will see on your Dashboard access to the FDS COELIG Reporting System
Who is entitled to an exemption?
Faculty members are eligible to file for an exemption. Policy Makers are NOT eligible to apply for exemption.
The Commission is authorized to grant an exemption to CUNY faculty who are not involved in:
- purchasing or contracting activities;
- administrative duties such as serving as chair or director of a department or program*; or
- receiving externally funded grants**
What if I am the Chair of my department, or I administer a grant?
In both situations you are not eligible for an exemption.
* Department Chairs as Policymakers: Department Chairs are CUNY employees charged with administrative duties including purchasing authority (however limited) and the management of the members of the department and support staff. Under COELIG's definition of a policymaker, Department Chairs in academic departments possess discretionary policymaking authority and therefore are considered policymakers and will not be granted an exemption from filing an FDS. Department chairs are required to file an FDS by the May 15, 2024 deadline for policymakers.
** Grant administrators: A grant administrator is required to file FDS as an academic filer (November 15, 2024).
How do I obtain an exemption?
If you do not have an exemption and believe you qualify for one, faculty members only can fill out and file the exemption form or apply electronically directly with COELIG by November 15, 2024. The exemption from FDS filing requirement can be accessed from the Exemption tab on your dashboard.
The COELIG exemption form requires that I attach a job description, but I don’t have one. What do I do?
Where a job description is not available, an academic applicant may submit either of the following:
- A copy of the current annual report which the applicant filed with his/her department, or
- A job description prepared by the applicant that includes the following: whether the individual is involved in purchasing or contracting activities; administrative duties such as chair or director for a department or program; and, whether the individual received externally funded grants.
If I have previously filed for and been granted an exemption, do I have to file for exemption again?
No. If you have previously filed for and been granted an exemption from filing an FDS and there have been no changes in your duties and responsibilities, there is no need to file for a new exemption. The original exemption continues to be effective.
I applied for an exemption. When will I hear if it is granted? Do I have to file while I am waiting to hear?
Generally, you will receive a reply within 10 days. You may file the disclosure statement in addition to the exemption request. If your exemption is approved, COELIG will return your original form and no record of it will be retained by the Commission. If you choose to wait for a response and are denied, you are given 20 days from the date of denial to file your FDS.
In determining my salary, do I look to the amount associated with my title or the amount I actually earned last year?
You look to the amount associated with your title. For example, if you worked part-time in a title that pays a full-time salary in excess of the filing rate of $111,897 or if you have been on sabbatical for a portion of the year in a title that pays in excess of the filing rate of $111,897, you must either file an FDS or apply for an exemption regardless of how much you actually earned.
What if I have a personal emergency and cannot file on time?
Ask COELIG for an Extension. Call COELIG at 518-408-3976 and ask for the help desk. The relevant form “Application for an Extension” (Academic Filers) and instructions are available at: COELIG Filing Information and Forms
What if I Fail to File?
You must file as soon as possible, or you may be in trouble. Pursuant to the Public Officers Law §73-a (4), [the Financial Disclosure Filing Statute] penalties of up to $40,000 can be imposed for failure to file. Also, Notices of Delinquency for failure to file an FDS for the specific calendar year 2023 will be posted on the Commission’s website. Again this year, the Commission will assess penalties for filings received after the statutory deadline. To avoid fines, your form must be received no later than the deadlines noted above [Policy Makers: May 15, 2024; Faculty Members: November 15, 2024.] New employees required to file must do so within 30 days of commencing employment.
But I still have more questions, where do I go?
For questions regarding COELIG policies or ethics concerns, please contact Lois Florman, Esq. at LFlorman@qcc.cuny.edu
For questions regarding access or general questions on filing or applying for exemption, please contact Martha Aspromatis at maspromatis@qcc.cuny.edu
You may also go to the COELIG website for more information on Financial Disclosure Filings, including a step by step guide to answering each question, please see Guide to Filing the 2023 New York State Annual Statement of Financial Disclosure.
If you have any other questions or need additional information with respect to these rules please call your ethics officer, or if you need help filling out either of the forms please call the COELIG FDS Unit at 1-800-873-8442 and press#3; or by email to fdshelpdesk@ethics.ny.gov.
Taking ESPARC and WVP Trainings
In accordance with New York State law, all full-time and part-time employees must complete both the 2023-2024 Employee Sexual and Interpersonal Violence Prevention and Response Course (ESPARC) and the 2023-2024 Workplace Violence Prevention (WVP) course. You are required to take these trainings every academic year, regardless if you have taken them in the past. The ESPARC and WVP training programs are administered via CUNY Blackboard. The courses are presented in a different format from previous years. Please take a moment to read the instructions below.
Part-time employees must complete the two courses before the end of the Fall, 2023 semester. Full-time employees must complete the two courses by May 31, 2024.
** Reminder to Teaching Adjuncts: The PSC/CUNY contract provides for paid office hours that include time allocated to trainings such as ESPARC and WVP.
How to access ESPARC and WVP via Blackboard
- Log-in to Blackboard on either a PC or MAC using Microsoft Edge, Google Chrome, Safari, or Mozilla Firefox.
- Look for “My Organizations” on the right-hand side of the screen. The training courses are listed below.

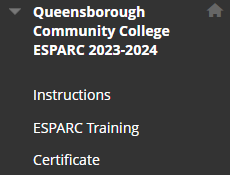
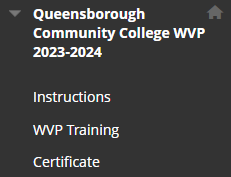
- Click on either "Queensborough Community College ESPARC 2023-2024" or “Queensborough Community College WVP 2023-2024” as shown here:


- You must complete the training in one sitting or you may encounter problems completing the course and/or getting your Certificate of Completion.
- The trainings have a new format for 2023-2024. Most of the content is non-video based.
- You must click on “Marked Reviewed” at the end of each slide. Use the “Table of Contents” or the arrow to advance to the next slide after you have clicked “Marked Reviewed”.
- You will be prompted to take periodic knowledge checks. You cannot go back and revise your answers, so make sure to answer all the questions.
- At the end of the course proceed to the “Thank You” screen from the “ Table of Contents ” and click “Marked Reviewed” in order for it to register you have completed the training and to generate a Certificate of Completion. It is also recommended to take a screen shot of your completion screen.
- You can access the certificates from the main menu of each training as shown here:
- Please email a copy of each certificate to HumanResources@qcc.cuny.edu. The certificate will be placed in your personal file as proof of completion. You can also send a screen shot.
If you have any questions or encounter any technical difficulties or are not sure if you have completed the required training, please contact Martha Aspromatis at maspromatis@qcc.cuny.edu.
For questions or concerns regarding your rights under Title IX, or any issues concerning CUNY’s Policy on Sexual Misconduct, please contact Belinda Delgado at bdelgado@qcc.cuny.edu.
For questions or concerns regarding Workplace Violence Prevention matters please contact Lois Florman at lforman@qcc.cuny.edu.
CUNY Policy on Sexual Misconduct: CUNY Policy on Sexual Misconduct
CUNY Workplace Violence Prevention Policy: CUNY Workplace Violence Prevention Policy
FAQ for ESPARC/WVP Training: Compliance Training FAQ
Confirming your Email in CUNYfirst
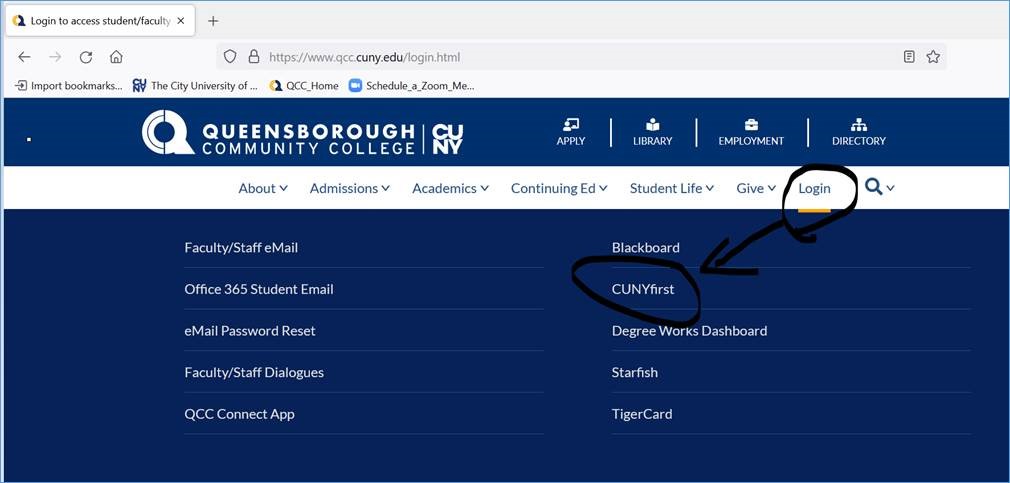
- Open an Internet browser and go to the QCC website.
- On the QCC home page, click “Login” and then “CUNYfirst” link, as illustrated below.
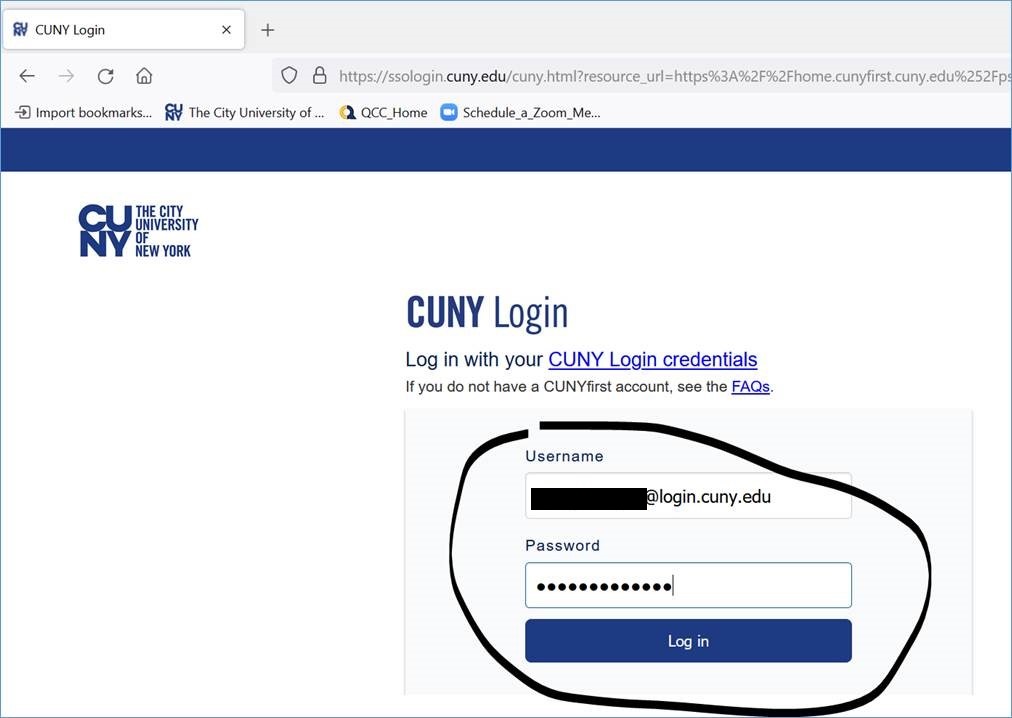
- On the CUNYfirst login page, type in your CUNYfirst username and password, as illustrated below.

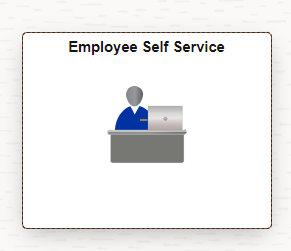
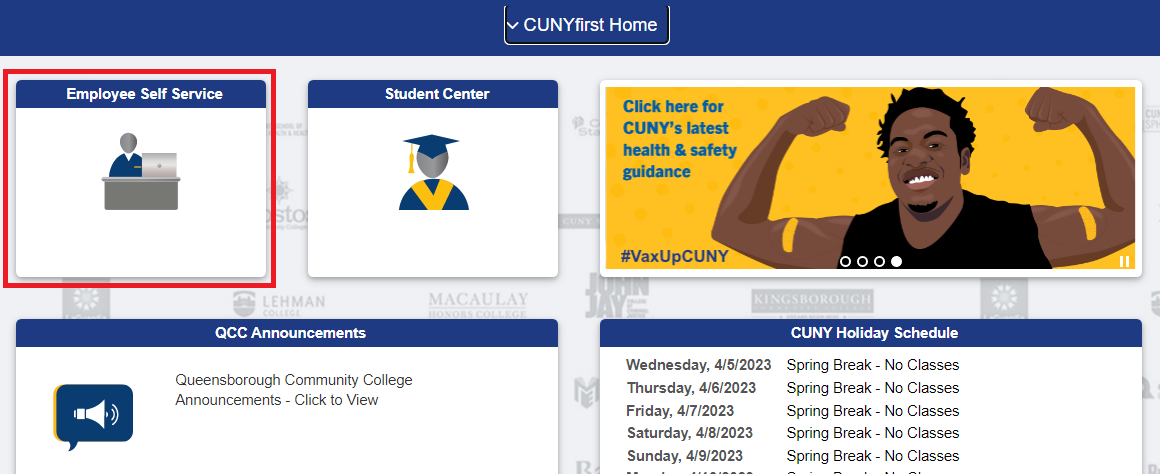
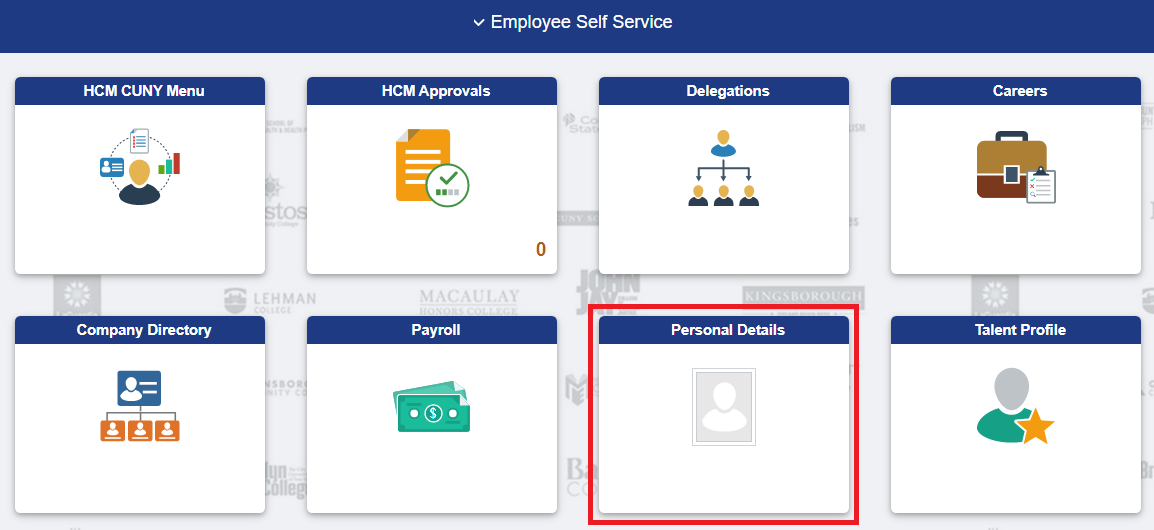
- On the CUNYfirst landing page as shown below, select the “Employee Self Service” tile.
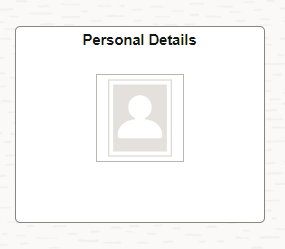
- Select the “Personal Details” tile.
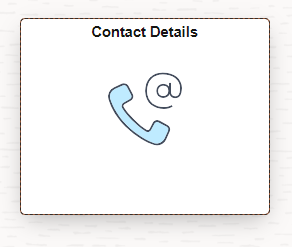
- Select the “Contact Details” tile.
- Make sure your QCC email is checked as “Preferred.” If it is not, please reach out to Human Resources.
Please remember to log off your account when you are done updating or using the system.
Updating Your Emergency Contact Information in CUNYfirst
- Open an Internet browser and go to the QCC website.
- On the QCC home page, click “Login” and then “CUNYfirst” link, as illustrated below.

- On the CUNYfirst login page, type in your CUNYfirst username and password, as illustrated below.
- On the CUNYfirst landing page as shown below, select the "Employee Self Service" tile.
- Click the "Personal Details" Tile.
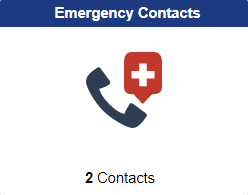
- Click the “Emergency Contacts” tile.
- Follow the actions below to update your emergency contacts.
- To add a new contact, click the “+” or the plus sign, as shown below and follow the instruction on the next page. Click the “Save” button when done.
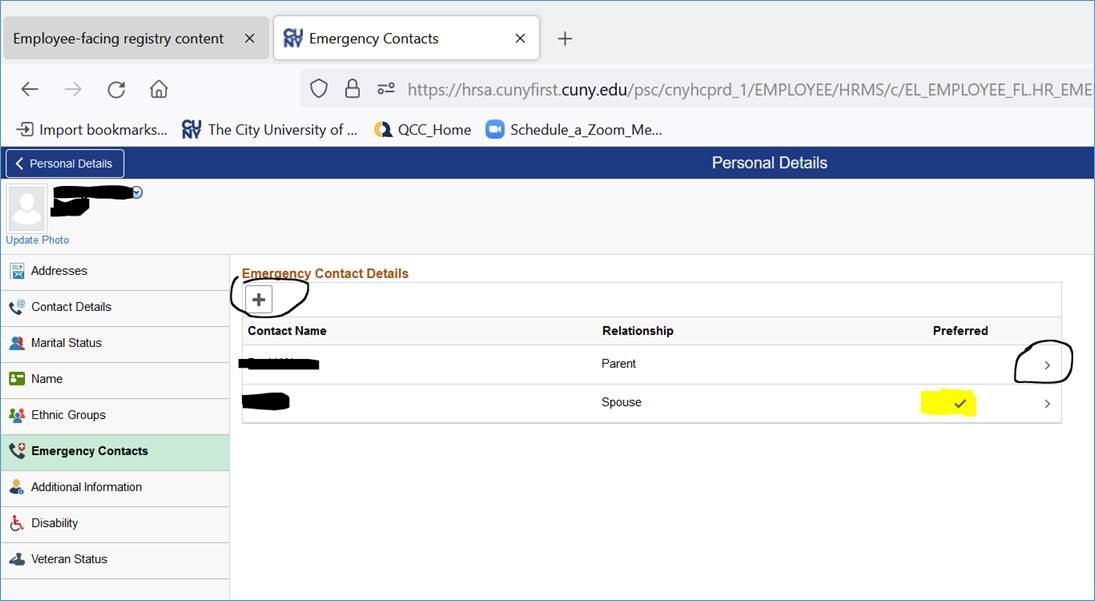
- To update information on an existing contact, click “>” or the greater than sign next to the person whose contact information you want to update. Follow the instruction on the next page. Click the “Save” button when done.
- To delete an existing contact, click “>” or the greater than sign next to the person you want to remove, click “Delete” button on the bottom of the next page, and click the “Save” button when done.
- To designate a new “Preferred Contact”, click “>” or the greater than sign next to the person who you want to designate as a preferred contact, and place a check on the “Preferred” checkbox, and click “Save”. You can only designate one preferred contact. In this illustration, that is the spouse. If you make a new designation, then the preferred check on the spouse will come off.
- To add a new contact, click the “+” or the plus sign, as shown below and follow the instruction on the next page. Click the “Save” button when done.
Please remember to log off your account when you are done updating or using the system.
Updating Your Personal Contact Information
- Open an Internet browser and go to the QCC website.
- On the QCC home page, click “Login” and then “CUNYfirst” link, as illustrated below.
- On the CUNYfirst login page, type in your CUNYfirst username and password, as illustrated below.
- On the CUNYfirst landing page as shown below, select the “Employee Self Service" tile.
- Click the “Personal Details” tile as illustrated.
- Click the “Contact Details” tile.
- Follow the actions below to update your contact information.
- To add a new contact, click the “+” or the plus sign, as shown below and follow the instruction on the next page. Click the “Save” button when done.
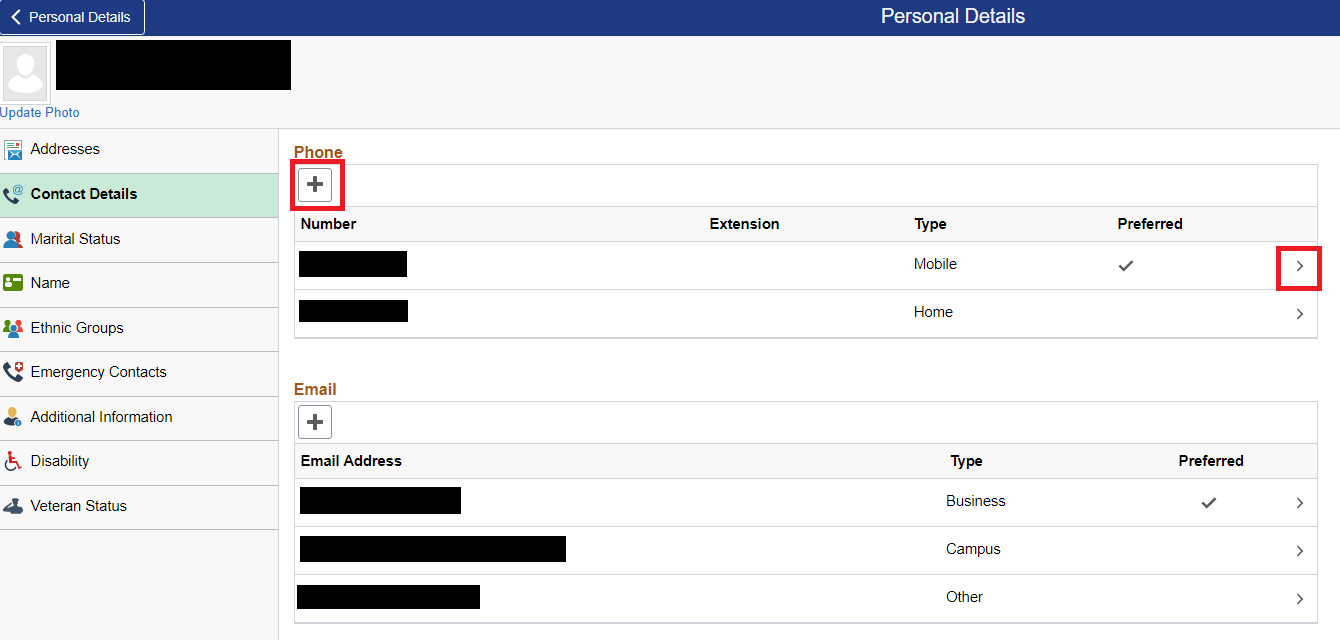
- To update information on an existing contact, click “>” or the greater than sign next to the person whose contact information you want to update. Follow the instruction on the next page. Click the “Save” button when done.
- To delete an existing contact, click “>” or the greater than sign next to the person you want to remove, click “Delete” button on the bottom of the next page, and click the “Save” button when done.
- To designate a new “Preferred Contact”, click “>” or the greater than sign next to the information you want to designate as a preferred contact, and place a check on the “Preferred” checkbox, and click “Save”. You can only designate one preferred contact.
- To add a new contact, click the “+” or the plus sign, as shown below and follow the instruction on the next page. Click the “Save” button when done.
Please remember to log off your account when you are done updating or using the system.
Updating Your Address in CUNYfirst
- Open an Internet browser and go to the QCC website.
- On the QCC home page, click “Login” and then “CUNYfirst” link, as illustrated below.
- On the CUNYfirst login page, type in your CUNYfirst username and password, as illustrated below.
- On the CUNYfirst landing page as shown below, select the “Employee Self Service" tile.
- Click the “Personal Details” tile.
- Click the “Addresses” tile.
- Follow the actions below to update your contact information.
- You will see options for "Home" and "Mailing" addresses
- Click on the arrow on the far right of the screen where your address is displayed
- Make the appropriate changes and hit "Save"
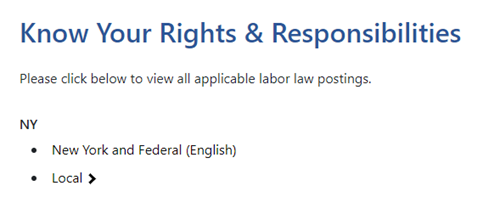
Accessing Employee EEOC Posters in CUNYfirst
- Log into CUNYfirst
- On the CUNYfirst landing page as shown below, select the “Employee Self Service" tile.
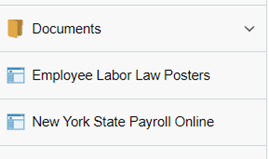
- Click on the “Other Employee Tasks” tile.
- Click on “Employee Labor Law Posters”
- In the box that comes up click on “Federal, NY State and Local Labor Law Posters”
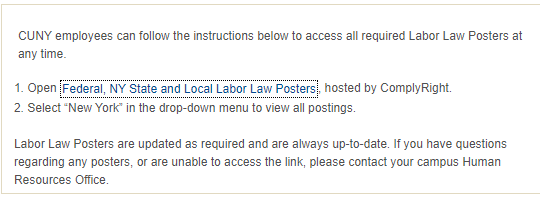
- Click on where is says “United States.” This will bring a drop-down menu. Then select “New York State”
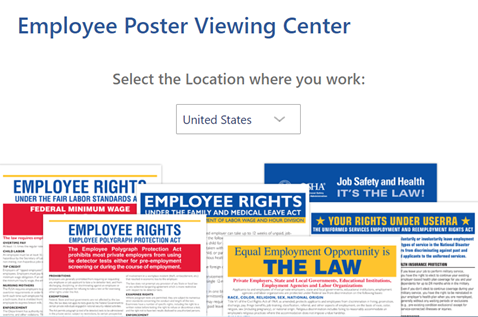
- Select either option to review current employment posters. The local tab will have a drop down menu where you can select “New York City”